Mounting Supple Tyres
• Rotational direction: Rene Herse tyres can be mounted in either direction.
• Supple casings make Rene Herse tyres fast and comfortable, but they don’t hold their shape by themselves like stiffer tyres. A little extra care is needed when mounting Rene Herse tyres on your rims.
Preparation
• Inspect the rim tape to make sure it covers all spoke holes. With tubeless compatible rims, always use tubeless rim tape, even when using tubes.
Please note : If you are replacing Tubeless tyres on Carbon Rims – it is best practice to replace the Tubeless Tape as a matter of course. This maximises safety and mitigates against rim failure in the event of poor tape condition.
• Check the valve hole. Remove sharp edges before mounting the tyre.
Installing The Tyre With An Inner Tube
• Place one bead of the tyre into the rim well.
• On tubeless-compatible rims, make sure the bead is in the curved “well” in the centre, not on the flat “shelves” on the sides of the rim bed.
• Barely inflate the tube so it holds its shape. Insert it into the tyre.
• Push the second bead over the rim sidewall into the “well”, starting opposite the valve. Push the valve inward as you push the last bit of the bead over the sidewall. It may be necessary to deflate the tube at this point.
Check The Tyre Seating
• Push the tyre sidewall inward and check that the tube is not trapped between tyre bead and rim.
• Inflate the tyre lightly (1.7 bar/25 psi). Check the line that is molded into the tyre sidewall : Do this on both sides of the tyre.
Good – Get out and ride!
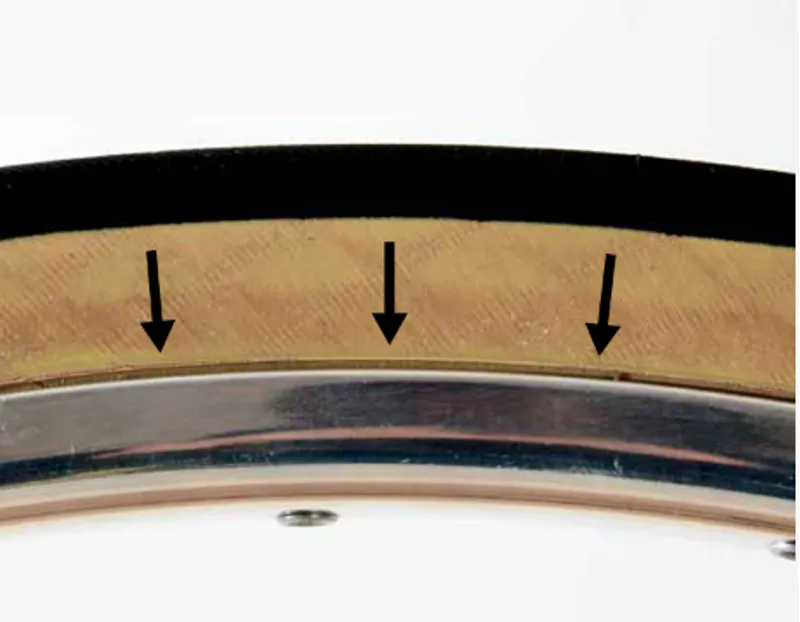
• If the line is even and parallel to the rim edge all around the tyre (above, arrows), the tyre is seated correctly. (Just below the molded line is a depression, which interlocks with the hook on the rim sidewall.)
Bad – Do Not Ride!
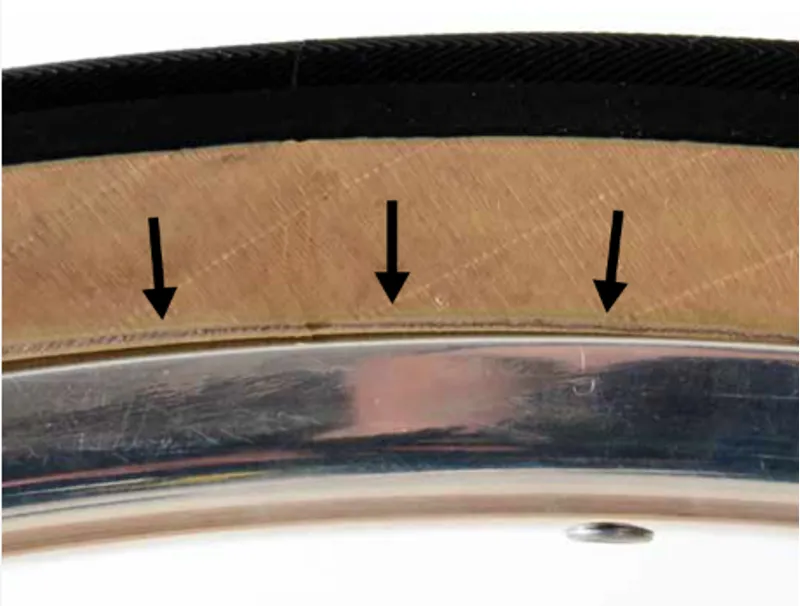
• If the line is uneven and/or disappears underneath the rim sidewall (above), then the tyre is not seated correctly.
• Tubeless-compatible rims: Inflate the tyre until it seats itself. (You may hear a “snap”.)
• Standard rims: Seat the tyre correctly before inflating it (below).
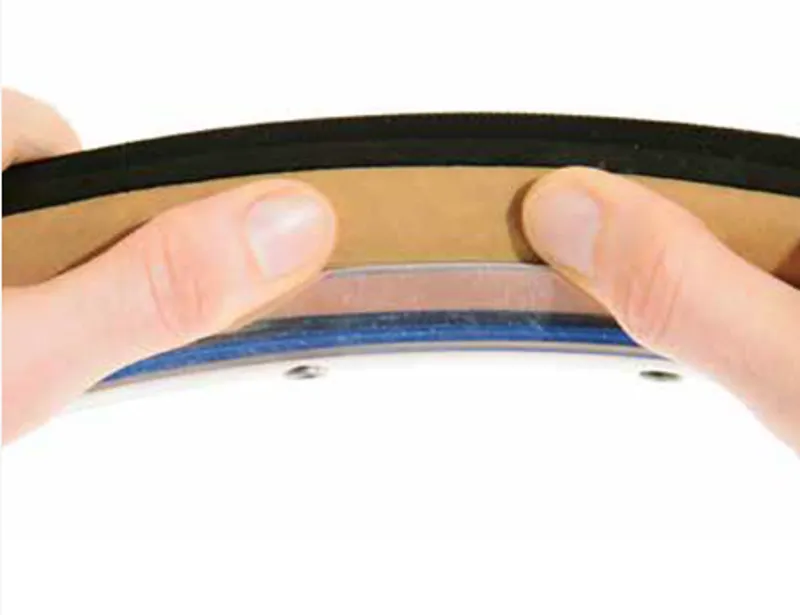
• Where the line is not visible, push the tyre outward until the line appears (above). Do this all around the tyre, until the line is even and parallel to the rim edge, on both sides of the tyre.
• Inflate the tyre. To allow the tube to seat well, deflate and re-inflate the tyre.
• Check that your tyre is seated properly before every ride.
Never Ride On A Poorly Seated Tyre!
• If you cannot get the tyre seated correctly, do not ride the bike! The tyre can blow off the rim, resulting in serious injuries.
• Bring your bike to us or your local, skilled bike shop and ask them for help with installing your tyre.
Tubeless-Compatible
Many Rene Herse tyre models are tubeless-compatible. Refer to the packaging to see whether your tyres are tubeless-compatible. Tubeless-compatible tyres can be used with inner tubes, or set up tubeless (with a sealant) on tubeless rims. We highly recommend Muc-Off No Puncture Hassle, Peaty’s Tubeless Sealant or Orange Seal for initial set up. Maximum recommended pressure for tubeless is 4.1 bar (60 psi).
Safety Advice
For your safety, perform the following inspection before every ride:
• Check that your brake pads are properly aligned. Squeeze the brakes hard. The pads must not come within 1 mm of the top of the rim. Check the pads: If a ridge has worn into the pads, then they are misaligned and can cut the tyre sidewall and cause a blowout.
• Inspect your tyres to make sure they are seated correctly. Refer to the instructions above.
• Do not exceed the maximum tyre pressure listed on the tyre sidewalls. Do not ride the tyres underinflated, so that they bulge out excessively. Either can cause a blowout and serious injuries.
Warranty
Rene Herse warrant their tyres against defects in materials and workmanship for one year after the original purchase. If the product is found defective by Rene Herse Bicycles, they will replace or repair it. If you feel that a product is defective in materials or workmanship, please send the product to us for evaluation. Please allow up to four weeks for the evaluation. This warranty does not cover:
• Damage due to improper mounting.
• Damage due to punctures, cuts or other road debris.
• Poor seating on out-of-spec rims (Velocity Synergy, Specialized Axis 4.0, etc.)
• Abrasion due to misaligned brake pads.
• Normal wear and tear; exposure to sunlight or noxious substances